Jaytrax
Welcome to Jaytrax. In this online helpfile you will find all the information you need to make music with Jaytrax. Furthermore you will find invaluable tips and tricks and some information how to incoorporate your own made music in your programs or on the World Wide Web. Don't forget to also visit the Jaytrax homesite at http://www.klaar.com to be sure to download the latest updates, get the latest information, download some free demotunes and be an active participant in online discussions and/or helpgroups or be subscribed to the Jaytrax mailinglist to get the latest news send out to you automatically.
Select a topic to go to: |
|
Chapter |
Sub topic |
|
|
|
|
|
|
|
|
|
|
|
|
|
|
|
|
|
|
|
|
|
|
|
|
|
|
|
|
|
|
|
|
|
|
|
|
|
|
|
|
|
|
|
|
|
|
|
|
|
|
|
|
|
|
|
|
|
|
|
|
|
|
|
|
|
|
|
|
|
|
|
|
|
|
|
|
|
|
|
|
|
|
|
|
| The Sample Editor | |||
| Visualising the sound | |||
| The MIDI module | |||
| Connecting your gear | |||
| Control changes | |||
|
|
|
|
|
|
|
Registration |
Don't forget to register your version of Jaytrax since this enables you get discounts on future updates, and to get help when you have encountered problems. Don't forget that the Jaytrax-Replayer software is free to use. If you have made a great song and you have put in on the web under your homepage, just add a link to the Jaytrax-Replayer plugin page on our site and everyone who enters your site and can't hear the music, can download the latest version of the Jaytrax-Replayer software for free, no strings attached. Remember that you have to register Jaytrax first before you can start distributing your music. To register now go to the Jaytrax page at: http://www.klaar.com now!
| Previous page | Next page |
Purpose |
Welcome to Jaytrax. Jaytrax is a music program which not only let's you compose music but let's you create synthetic sounds as well. You can really start from scratch and design sounds and instruments and with these create your songs. This gives some advantages. First of all the sounds which you can create are unique and very flexible. Since the sounds are synthetic in nature you can alter the sound realtime while the song is playing. The second advantage is that since there's only need to store parameterdata per instrument the song can remain really small. This is especially usefull if you want to use your created songs for your webpages where download time is scarce. The songs created with Jaytrax can be used freely on the web and in your own made programs. We have supplied some examples in the most popular programming- and authoring-languages and some examples how to incorporate your song in HTML.
| Previous page | Next page |
In a Nutshell |
A song in Jaytrax consists of several elements. The most basic of them is the Waveform. By combining these waveforms you make instruments. The waveforms not only control the timbre, but the volume, frequency and special effects like filters as well. With the created instruments you create Patterns. Patterns are short sequences of musical notes, played with one or various instruments. You could say that patterns are the building blocks of the main musical score. By combining and repeating these patterns you build your Songs or Subsongs. Everyone of these subsongs is a song in itself. But the whole collection of these subsongs is called a Module.
| Previous page | Next page |
Under the Hood |
Before we start explaining the program a little bit of theory is necessarry to really understand the program. The specifics can be found further on as we explain the instrument editor. The carrier of sound (and thus music) is waves in a medium. On earth the medium is usually air. The vibrations in the air our ear picks up as sounds. Everything which makes sound does so by vibrating the air. Our vocal-chords for instance vibrate the air in elaborate ways to produce speech, a string of a guitar swings too which in turn vibrates the air. The cone of the loudspeaker too vibrates (you can easily verify this by holding your hand near the loudspeaker while playing music) and the way it vibrates is the key to the sound reproduction of Jaytrax.

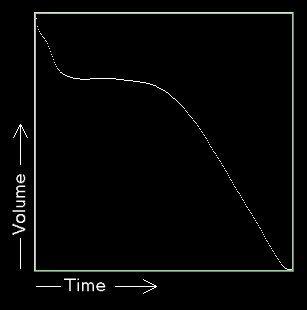
Jaytrax gives you the control on how the loudspeaker-cone vibrates. You do this by drawing the wave in a Waveform. The shape you draw is the actual movement the cone will make when you play the sound. This movement is repeated indefinately. At this place we shall introduce some terminology. The length of the waveform is called the Wavelength. If you imagine the waveform as the cone vibrating around an axis in the middle you could say that the average fluctuation is perceived as the volume of the sound. If the fluctuations increase, the volume increases. This average fluctuation is also called Amplitude. The nr of waves which are played per second speed is called the Frequency. The faster the waveform is played, the faster the cone vibrates and the higher the perceived tone. See figure 1 for a visualisation of the Wavelength and Amplitude properties of a wave. For the more mathematical under us, there is a direct relation between the wavelength and the frequency. If you halve the wavelength, the frequency will double. This is logical since there are more repetitions of the smaller wave per second, thus the frequency is higher.
Volume and Panning Control
The control of the amplitude and the frequency in Jaytrax is also done by a waveform. The amplitude of a sound can be modulated by a waveform. The shape of the waveform decides how the amplitude (or volume) of a sound behaves in time. If you look at the waveform in figure 2 you see an example of such an 'AM-Wave' (Amplitude Modulation). Starting from the left you see the wave rapidly decreasing height, than staying at one level for some time and then decreasing untill it reaches the bottom. So, if we use this wave as modulator for the amplitude, the sound would start hard, then decrease swiftly in volume, stay at an intermediate level for some time and then decrease untill you can't hear it any more. With this method you can easily accomodate for any possible volume characteristic for a sound. From swelling strings upto little echoes.
But it doesn't stop here. As most people you probably have 2 ears as well so we would also want to control the balance between the left and right volume. We call this balance the pan. The movement of sound from left to right or vice versa is called panning. The way we control this positioning in the stereo-spectrum is again done by a waveform. As like with the wave which controlled the volume this pan-wave controls the pan-postition. The middle of the wave could be seen as a perfect balance between the left and right volume. If you for instance assign a sine wave as panwave, the sound will gradually go from left to right and back again.
Frequency Control
So now we have a waveform which controls the volume and we have one which controls the stereo-position. But we still have one charecteristic left out: The Frequency. First of all, the frequency is controlled by the note you play, this is the base frequency. With this base fequency as the center you can increase or decrease the frequency a bit over time. This is done the same way you controlled the pan and the volume, by a waveform. Figure 3 shows an example wave.
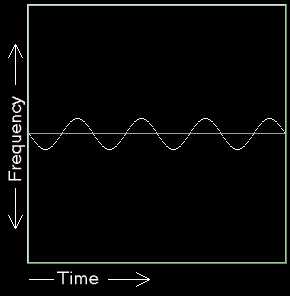
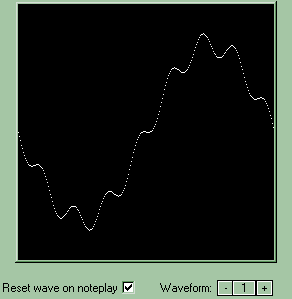
As you can see the wave is a sinewave which cirles the middle. If you assign this wave as the FM (Frequency Modulation) wave, the frequency will swirl a little around the note you played like a siren. Influencing the frequency like this does so without respect for scales or note-frequencies. There is another method which can change the frequency in time with respect to note-frequencies. This method is called the arpeggiator. An arpeggio is a quick succesion of notes. With an arpeggio you can simulate playing 2 or more notes at the same time with just one instrument (like chords). Last but not least there is a finetune option. The finetune can tune sounds which are off-key with other sounds. You would normally not need the finetune function when you only use the synthesis because they won't be off-key to one another. You could be needing it though when you import sampled sounds, or when you want to tune Jaytrax in respect to other machines which produce sounds, synthesizers for instance.
Special Effects
The way the waveform looks ultimately decides how it sounds. A wave which resembles a sine sounds really different then a waveform which resembles the tooth of a saw. This is because a waveform is a actually a collection of a lot more basic sinewaves of all different frequencies added up. The unique way all these basic sinewaves of different frequencies are added up is called the timbre. Any conceivable sound is build up this way. What makes interesting sounds is if you could change the timbre while playing the sound. Jaytrax can do this in many unique ways. Again this process is controlled by waves just like the volume and the frequency is.
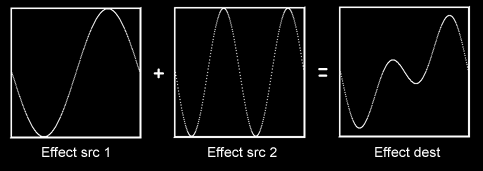
Most effects consist of a destination wave, one or two source waves an oscillator wave and the effect parameters. In figure 4 you can see an example effect called 'Wavemix'. This effect mixes 2 waves with a given offset to a destination wave. Since the parameters of the sound can be changed in realtime while the sound is playing (or the song for that matter) you can obtain a lot of control over the sound. The dynamic changing of the effect parameters can be done with the aid of the oscillation wave. Again, like before, you can assign one of the waveforms as being the oscillator. This waveform changes one of the effect parameters just like it did the volume or the frequency. All instruments are stackable. This means that any given instrument can use upto 4 effects at the same time. This way really complex sounds can be created.
| Previous page | Next page |
The Sound of Music |
Before continuing with the program we'll add a bit of music theory here. Although music is something very personal and everyone experiences it differently, there are some general rules and things one can say. First of all there are only 12 distinct notes. These notes however can be played on different octaves which make them sound higher or lower. An octave starts with the C note and the following 11 notes are called: C#, D, D#, E, F, F#, G, G#, A, A#, B. The notes with the # attached are called half-notes. On the keys of a piano it seems obvious why they are called so.
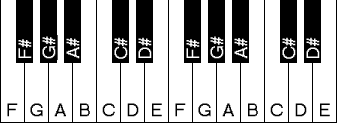
If you look at how the black keys (the half-notes) are placed you would think that the distance between 2 adjacent white notes is always twice as big as the distance between a white and an adjacent black note. But no… The distance between C and C# is just as big as between C# and D and as big as between F and G…so the term 'half-notes' is a bit misplaced. If one would design a keyboard with all the keys next to eachother, black and white alike, it would be more logical, but since pianists nowadays don't have hands big enough to span an octave they choose this layout. Adjusting the statement about equal spacing between notes a little bit we have to admit that the exact relation between notes isn't exactly linear it's exponential. Every 12 notes the frequency is doubled. So if you play the C in the fith octave and you want to play it in the sixth you double the frequency. The note will sound the same, since it is the same note, but it is an octave higher. The notation Jaytrax uses to specify which note and octave will be played is as follows: C in octave 4 would be written down as: C-4 and F# in octave 6 would be written down as: F#6. An octave begins with the C and ends with the B, the note right to the B is the C again but one octave higher.
A musical piece is subdivided in measures and a measure is subdivided into beats. Beats can be thought of the rhytm to which you tap your foot when you hear a tune. A measure is 3, 4 or more beats, depending on the rhytm. A typical rhytm is the 4/4 rythm which stands for 4 beats per measure. This means that usually there are repetitions every measure. In Jaytrax the equivalent of the measure is a pattern. If you have a 4/4 measure you use the full length of the pattern, if you have a ¾ measure you only use three quarters of it.
| Previous page | Next page |
The Instrument Editor |
Surfing the Waves
Now let's look at all the different parts of Jaytrax in detail. We'll start with the instrument editor. You get there from the main window (The song editor) by pressing the Inst-Edit button.
![]()
To create a new instrument you can press the 'New Instr'Button. It creates a new instrument and selects it. If you're not happy with it press the 'Delete Instr' button, but remember that you can't delete the last instrument, you always need at least one. If you delete an instrument which is used in your song somewhere you will be warned. With the 'Save Instr' button you can save your instrument on harddisk. The 'Load Instr' loads a previously saved instrument in a new slot (Thus: it doesn't overwrite the current instrument you're working on).
The graphic display on the right side of the screen displays any of the 16 available waves. You can browse through these waves by clicking the '-' or the '+' button right of the text 'Waveform' underneath the display. You can also click on the box with the current waveform nr in it to directly type a waveform number. All buttons on the instrument edit screen work similarly in this respect. Note that the display also switches to another waveform when you select any option somewhere involving the choice of a waveform. The display will then show the waveform you have selected.
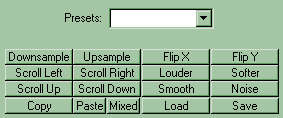
Under the waveform display you see a grid of numerous buttons. All these buttons interact with the currently displayed waveform in one way or the other. First of all, just above the array of buttons there's a little dropdown box labeled 'Presets'. Under it are, as the name cleverly suggests, some standard waveform presets tugged away. If you select one, the currently selected waveform is replaced by the selected preset. Gliding form the left to the right we see a button called 'Downsample'. This function stretches the left part of the waveform to the complete size. This typically results in the waveform sounding an octave lower (since in effect we doubled the wavelength). Next to it we find the 'Upsample' button which does the exact opposite, it squashes the waveform into half it's size and copies it right next to it. This has the effect of doubling the octave (since the wavelength is halved). 'Flip X' flips the wave around it's imaginairy vertical axis and 'Flip-Y' around it's horizontal axis. 'Scroll Left' scrolls the wave to the left where the bits which scroll of on the left are added on the right. 'Scroll Right' does the same but in the opposite direction. 'Louder' enlarges the amplitude of the waveform by a few percent. If the wave is too large the result is clipped by the upper- and bottom border. 'Softer' decreases the amplitude of the waveform. 'Scroll Up' scrolls the wave up (With the bits falling off on the top added to the bottom) and 'Scroll Down' does the exact same but in the opposite direction. 'Smooth' removes all the hard jaggy edges of the waveform. This results in a waveform which not only looks smoother but sounds more smooth as well. 'Noise' adds random distortions to the wave giving it a more rough edge. 'Copy' copies the wave into a temporary buffer and 'Paste' copies it back into the selected waveform. Last but not least we have a 'Load' button which loads any previously saved waves from Harddisk. The 'Save' button saves the waveform data to harddisk.
Volume and Frequency Control
Please note that while you're creating an instrument you can hear it by typing the keys on the keyboard. The keys on the keyboard map to the keys of a piano. The Q-key is the equivalent of the C-note and the I-key is the C-note too but one octave higher. The same goes for the Z-key upto and untill the '<'-key. Function keys F1-F8 select at which octave the keyboard is mapped. If you have a MIDI device attached you can use that too of course!

The dropdown box on the top of the window let's you select one of the instruments you have created or loaded. With the 'Rename' button next to it you can rename the current selected instrument. Note that this is not the name with which you save it to disk but it is the name with which it is known in the program. The Timbre section let's you set which waveform is ultimately heared.

You can have 5 waveforms added up, distorted and manipulated but eventually the end result should be in one wave only. The wave you will hear is the wave you select in the 'waveform' box and this is the waveform which will be send to the mixer. The used wavelength can be altered right underneath in the 'wavelength' box. A standard waveform is 256 samples big. If you select a smaller wavelength you can raise the octave by a factor 2 to 5. Underneath are a couple of parameters which influence the volume of the instrument.
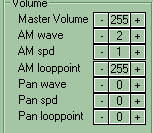
First of all there's the 'Master Volume' which decides how loud the perceived volume will be in contrast to the other instruments. The master volume ranges from 0 (silence) to 255 (full volume). The reason why a lot of parameters range from non-expected values like 0-255 instead of the more understandable 0-100% is that we've choosen not to transform any of the internally used values. Projecting the full range of 256 distinct values to 100 values would be a loss of granularity and would result in strange rounding errors. Next under the master volume is the 'AM wave' selection box. Here you select the wave which will decide the course of the volume through time. If you select 0 the volume won't be modulated and it will only sound at the specified master volume. The 'AM spd' selects how fast the volume wave will be traversed. The 'AM-looppoint' specifies where, if the end of the wave is reached, at which position it will pick up again. If you for instance specify 0 as AM looppoint the volume modulation will repeat if the end of the wave was reached. If you specify 255 the wave will continue looping on the end and sustain the last value from the wave. The 'Pan wave' selects which waveform controls the stereo-panning over time. The 'Pan spd' controls with what speed and the 'Pan looppoint' is similar to the AM looppoint. Then next section has to do with the control over the frequency of the instrument.
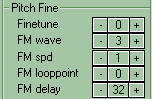
The 'Finetune' tunes the sound ever so slightly. This option is usefull to tune the instrument in respect to other sounds or in respect to external equipment. 'FM wave' selects which waveform will modulate the frequency. If you select 0 you disable this option. The 'FM spd' and the 'FM looppoint' work similar like their AM counterparts. The 'FM delay' selects after how much time the frequency modulation will commence. For some effects this is usefull like when you want want for instance to incorporate a little vibrato effect on your instrument but you want to let it start after some time.
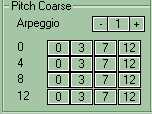
Last but not least underneath we have the arpeggio section. With the main 'Arpeggio' selector you can select which arpeggio you attach to the sound. An arpeggio is a rapid succesion of notes. The notes are specified as relative values to the played base note. In the example as seen in the figure we see the values 0, 3, 7 and 12. Given that you played a C-7 note, because of the arpeggio data you will hear the notes C-7, D#7, G-7 and C-8 in rapid succesion. Other note values can be edited in the available 16 arpeggio-slots. Please note that the arpeggio data's are NOT saved per instrument since they are shared by all instruments, hence the arpeggio data is saved when you save the song. Instead of using waveforms you can also use Samples. Samples are basically the same thing as waveforms with the difference that they can be substantially larger. Samples are usefull if you want to use sounds which can't be synthesized by Jaytrax. Examples of these sounds are drums/percussions/speech etc etc…ujm; Note that if you use samples, you can't use the special effects on them. The special effects are especially designed for the small waveforms and not for bulkdata like samples. The AM/ FM and Pan modulation does work however. To import a sample go to the sample editor. If a sample is currently attached to an instrument it's name will be visible in the namefield just above the 'Delete Sample' button. This button removes the sample from memory and re-enables the waveform output. This can also be done from the sample editor.
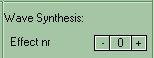
Playing a static waveform doesn't give much depth to the sound so in Jaytrax you can dynamically change the waveform over time. Each instrument can have 4 of these effects simultaneously. Choosing which one of those four you will be altering can be done with the 'Effect nr' selector.
Typically all the effects consist of 1 or more input waves and an output wave. A wavemixing effect for instance would consist of 2 input waves which will be mixed into 1 output wave. A noise generator effect would only require a destination wave. The input wave is called the source wave and the outputwave is called the dest wave(short for destination wave).

Selecting which wave(s) are source and which one is the destination can be done in the 'Source Wave 1', 'Source Wave 2' and 'Dest Wave' selection boxes. After setting the in- and output waves you can select which kind of effect should be performed on the input wave(s) by selecting one from the 'Effect Type' dropdown list.
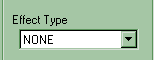
For precise descriptions of every available effects read the next chapter. The effect selector is also the 'on-off'-switch of the effects. If there is no effect selected there is no wave manipulation performed, but if you select an effect it will be executed every time you play the instrument. Note that some of the effects are more processor-time draining than others, to get insight in these figures look at the 'processor overhead' meter in the Song editor. Some of the effects have configurable parameters.
![]()
If an effect doesn't have them the parameters are named 'Not Used' and they are disabled, if an effect does have parameters they are named appropiately and enabled. If you would for instance select 'Filter' for effect the 2 parameters are called 'Center Freq.' And 'BandWidth'. The first parameter sets the center frequency of the digital filter and the BandWidth selects how many frequencies will be passed through around that frequency. The 2 'O' buttons just before the parameters are a selection switch deciding which one of the parameters will be oscillated. If the 'O' button is pressed that parameter will be oscillated if an oscillation wave is selected. The wave which oscillates this parameter can be selected in the 'Oscillation Wave' selection box.
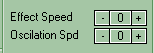
The speed of the oscillation can be set in the 'Oscillation Spd' box. The 'Effect Speed' box sets the speed of the effect if this is applicable for the selected effect.
![]()
Last but not least there is the 'Reset effect on noteplay' switch which decides if the internal effect variables should be reset if a new note is played or if the effect should be independend and continuous. Same goes for the 'Reset wave on noteplay' switch which is located under the waveform display. For every wave you can set this switch. If it is set, the contents of the wave are reset everytime a note is played. This is usefull if the effects have changed the waveforms and need to be re-initialized to their initial form so the sound is always the same. Beware of setting this switch on waves which don't need re-initting since it can cause annoying clicks. To give an example: If you have an effect which mixes wave 3 and 2 to wave 1 and that's the wave you are hearing, you typically don't want to re-init waveform 1 everytime you play a note since it is generated anyway by mixing wave 2 & 3. Please note that while you are creating instruments and you want to reset the sound you can press the spacebar. This will re-initialize all the sound channels from Jaytrax and mute everything. This way you are sure to hear exactly the sound you are creating.
The Effect-List
Which effect does what and which of the parameters are interesting? Following is a short list of the available effects and a brief description of what they do.
| Effect name: | A desciption of what the effect does. |
| NONE | This effect does nothing and is used to disable the effects. |
| NEGATE | This effect flips the dest waveform one sample at a time. The 'Effect Speed' selects with with speed. This effect can be used to emulate a blockwave with a dynamically changing pulsewidth. This effect has no parameters. The 2 source waves and the oscillation waves are not used. |
| SWEEP | Sweep is an effect which transforms the destination wave by adding a sloped wave to it. This effect sounds like the waveform is being teared all over the frequency spectrum. The speed with which the transformation takes place is set with the 'Effect Speed'. There are no parameters and the source and oscillator waves have no effect. |
| AVERAGER | The averager-effect averages the wave and by doing so makes the sound more smooth. This effect is usefull to emulate the damping of a string of a guitar for instance. The highest frequencys damp the quickest, the lowest the slowest. 'Source Wave 1' is the wave which will be dampened into 'Dest Wave'. The 'Effect Speed' selects how fast the dampening will be done. Speeds greater than 12 don't have any effect anymore since it would cost too much processor time. There are no parameters and the oscillation wave has no effect. |
| WAVEMIX | The wavemix effect mixes the 'Source Wave 1' and the 'Source Wave 2' into the 'Dest Wave'. After mixing the waves the second source wave is offset a bit so the mixing of the wave is dynamic. The speed with which this offset changes can be set in the 'Effect Speed'. There are no parameters to be set and the oscillation wave has no effect. |
| FILTER | This effect is the digital equivalent of a bandpass filter. A filter filters out unwanted frequencies out of a sound. A bandpass filter only passes through a window of frequencies. The filter has 2 parameters: The center frequency and the bandwidth. The center frequency is the middle of the window and the bandwidth is the width of the window. The oscillation wave can oscillate both the frequency and the bandwidth. 'Source Wave 1' is the wave to be filtered and the result will be put in 'Dest Wave'. The 'Effect Speed' has no effect. |
| FILTWHISTLE | The filtwhistle effect is a variation of the previous filter effect. The filter formula has been adapted a bit so that the filter has become unstable and can also resonate some frequencys. This sound can be wanted in modern dance songs giving sounds a rough edge. See for a description the filter effect. |
| MORPH | The morph effect gradually changes 'Source Wave 1' into 'Source Wave 2'. The result of this morph is placed into 'Dest Wave'. The 'Morph Amount' parameter specifies how far the morphing process is in progress. This value can be oscillated using the 'Oscillation Wave' to make an automatic morph. The 'Effect Speed' doesn't do anything but if the 'Morph Amount' parameter is oscillated the 'Oscillation Spd' will specify the speed of the morph. |
| DYNAMORPH | The Dynamorph is a variation on the previous morph effect. Again the 'Source Wave 1' and 'Source Wave 2' can be morphed into one another but this time they do it over the length of the wave. The left of the 'Dest Wave' could resemble the first wave and the right resemble the second. The placing of where in the destination wave 'Source Wave 1' starts is set in the parameter: 'Morph Offset'. Again this value can be oscillated with the 'Oscillation Wave'. |
| DISTORTION | The distortion effect amplifies a waveform to such an extent that it wouldn't fit in the waveform diaply anymore. Everything which doesn't fit anymore, reflects and this way remains in the display. The amount of the amplification can be set in the 'Dist. Value' parameter. This parameter can be oscillated via the 'Oscillation Wave'. The 'Effect Speed' has no effect on the effect. |
| SCROLL LEFT | The scroll left effect moves the waveform to the left and every bit which falls of on the left side is added on the right. This effect has no audible effect but it can be usefull if the wavelength is smaller than the full 256. If this is the case it can give a constantly changing sound. The source and oscillation waves are not used and the 'Effect Speed' has no effect. |
| UPSAMPLE | The upsample effect doubles the wave every time a time interval elapses, resulting in a doubled frequency (or one octave higher). The time interval is defined with the 'Time Interval' parameter. If the parameter is set to 0 the effect is constant. The effect upsamples the 'Source Wave 1' into the 'Dest Wave'. The 'Effect Speed' has no effect here. The 'Oscillation Wave' could be used to oscillate the 'Time Interval' parameter. |
| CLIPPER | The clipper effect is reminiscent of the distortion effect. The waveform is amplified to such an extent that it wouldn't fit in the waveform display anymore. Everything which doesn't fit anymore is clipped to the upper and lower boundarys. The amount of the amplification can be set in the 'Dist. Value' parameter. This parameter can be oscillated via the 'Oscillation Wave'. The 'Effect Speed' has no effect on the effect. |
| LOWPASS | This effect is the digital equivalent of a lowpass filter. A filter filters out unwanted frequencies out of a sound. A lowpass filter only passes through frequencies lower than the cut-off frequency. The filter has 2 parameters: The 'Cut-Off Freq' and 'Resonance'. The cut-off frequency is the frequency which is the highest frequency which will be passed through. The resonance is a special parameter which specifies the amount of resonance given to the frequencys passing around the cut-off frequency. The low-pass filter is often used in housemusic to make synthetic bass sounds. The oscillation wave can oscillate both the cut-off frequency and the resonance. 'Source Wave 1' is the wave to be filtered and the result will be put in 'Dest Wave'. The 'Effect Speed' has no effect. |
| HIGHPASS | This effect is the digital equivalent of a highpass filter. A filter filters out unwanted frequencies out of a sound. A highpass filter only passes through frequencies higher frequency than the cut-off frequency. The filter has 2 parameters: The 'Cut-Off Freq' and 'Resonance'. The cut-off frequency is the frequency which is the lowest which will be passed through. The resonance is a special parameter which specifies the amount of resonance given to the frequencys passing around the cut-off frequency. The oscillation wave can oscillate both the cut-off frequency and the resonance. 'Source Wave 1' is the wave to be filtered and the result will be put in 'Dest Wave'. The 'Effect Speed' has no effect. |
| BANDPASS | This effect is the digital equivalent of a bandpass filter. A filter filters out unwanted frequencies out of a sound. The bandpass filter only passes through frequencies between two frequencies. The difference between this bandpassfilter and the effect called 'filter' which is also a bandpass filter is that here the width of the filter is fixed but you can specify the resonance as like the previous 2 filters. The filter has 2 parameters: The 'Center Freq' and 'Resonance'. The center frequency is the frequency around which frequencies are passed through. The resonance is a special parameter which specifies the amount of resonance given to the frequencys passing around the center frequency. The oscillation wave can oscillate both the cut-off frequency and the resonance. 'Source Wave 1' is the wave to be filtered and the result will be put in 'Dest Wave'. The 'Effect Speed' has no effect. |
| METALNOISE | The metal noise effect generates a noise wave at the 'Dest Wave'. This sound resembles white noise when played at low frequencies and has a metallic ring to it at higher frequencies. There are no additional parameters. The source and oscillation waves also have no effect nor does the 'Effect Speed'. |
| SQUASH | The Squash effect can squash and stretch an waveform in the horizontal direction resulting in a change in frequencie. Since the wave 'loops', the resulting sound won't smoothly change in frequency but has audible side-effects which can be wanted. The amount of stretching can be set with the 2 parameters. The 'Fine Squash' parameter can finely tune the amount of the squash-effect. The 'Coarse Squash' parameter tunes the squash amount too but more intense. The 'Oscillation Wave' can oscillate either parameter with the speed set in the 'Oscillation Spd'. The 'Effect Speed' has no effect. |
| Previous page | Next page |
The Pattern Editor |
After assembling our instruments we are now ready to start composing. The first place to go to is the pattern editor. To go to the pattern editor you can click on the 'Patterned' button or you can doubleclick on one of the patterns in the songgrid. A song consists of repeating patterns. Upto 16 patterns can be played at the same time but in the pattern editor you can only hear and edit one at a time.
On the right hand side you can select which pattern you want to edit from a list of available patterns. By clicking one time on the name of a pattern you select it and it will appear in the display. If you double click on the name of pattern you can rename it.
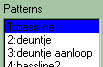
If you want to make a new pattern you can press the 'New' button, this will add a blank new pattern at the end of the list.

If you are not happy with a pattern you can remove it too, you do this with the 'Delete' button. If the pattern is being used in the song you will get a warning message. If you decide to delete the pattern anyway, any references to it in the song are replaced by references to an empty pattern. If you are really happy with a pattern and you want to store it for other projects you can save it to harddisk by pressing the 'Save' button. By pressing the 'Load' button you can reload your pattern. Note that the loaded pattern is added to the list of available patterns and doesn't replace the one which is currently selected. The 'Play Pattern' button plays the pattern and the 'Stop' button stops it. The 'Play Song' button plays the entire song from the specified location in the song editor. This can be usefull if you want to hear your pattern in the 'grand totale'. If you click the 'Edit' button you can alter (edit) the pattern. Just like the in the instrument editor the computer keyboard acts like the keys of a piano keyboard and the function keys switch the octave. Ofcourse, editing with a MIDI compaint device is also possible. If the 'Edit' button is pressed the notes you play are directly entered into the pattern at the place of the cursor. If the 'Edit' button isn't pressed the notes aren't entered but you can hear the current instrument. This way you can try a little bit first if you aren't to sure.
![]()
The quantize option let's you specify how much off you can be with your sense of rythm. The higher the quantize setting you specify, the more the computer will correct any rythmic mistakes. To change the instrument with which you are playing you can click on the instrument drop-down list.
![]()
The name of the pattern you are currently editing is displayed at the top of the screen. If you click on the name you can change it. The pattern consists of 64 rows. Every row can basically have one note on it and some specification with which instrument it is played. Additionally you can specify extra scripting data which enables you to alter any parameter of the current playing instrument. Let us now look at one row more specifically. The first entry is reserved for the main note to be played at that time. If you move the cursor to that position and the 'Edit' button is pressed you can enter another note there. By pressing the Del-key you erase the note. The place right to the note is a number which specifies with which instrument the note will be played. To know which number corresponds to which instrument you can check the instrument dropdown box, as you will see every instrumentname has a number before it. If you enter a note however, the current instrument is filled in automatically. By selecting instrument number 0 (an instrument which doesn't exist) the previous used instrument is played, but with a slight difference: Various internal counters aren't reset so that you can have slight variations in the sound.

The 2 numbers right to the instrumentnumber are called 'Destination'. In the left of the 2 you can type a note. When the 'Pitchbend'-script is active (more about scripting further on)below the playing note will be bend (The frequency will gradually go higher or lower) untill it reaches the destination note. With this feature it is easy to make guitar solos a professional guitarist has difficulty to play live. The number next to the destination note is used in conjunction with the other scripts. It is the value used to change parameters of the current playing instrument for instance. The value to the right (so this is the 5'th value from the left) is called 'Spd' and it defines the speed with which the 'Pitchbend'-script is executed. Note that if the destination note is lower in frequency than the start note that you must enter a negative spd. Last but not least the number on the righthand-side is the number of the script used. If you enter a zero here there is no script used. The scripts enable you to have unparalled control over every conceivable parameter of the playback. This includes changing the songspd dynamically or altering any of the instrument parameters. Let's give an example to illuminate this: Script number 4 is called: 'Chng Master Vol'. If you put this script somewhere in the pattern, the 'Master Volume' of the current playing instrument is changed into the value denoted by the 'Destination' value (the fourth value from the left). Note that the parameter is changed for good. You can rechange the parameter by adding another script which changes it back. Of course you can also go to the instrument editor and change the parameters by hand. The example in the picture will play instrument 1 starting from note C on octave 8 and heighten it until it reaches the note D flat on octave 8 with speed 3. One final thing to remember is that if you change the paramters of an instrument with the scripting options, they are changed permanently and have to be restored either by hand, or by resetting them elsewhere in your patterns (or by reloading the tune of course)
Sculpting Tools
To help with the more tedious and cumbersome tasks while creating patterns we have come up with a little toolbox to help out. First of all there is the 'Copy' button which copies the pattern to a temporarily buffer, easy when you quickly want to be able to undo something while you are trying something new.
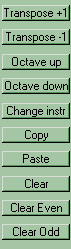
The 'Paste' button does the opposite and copies the contents of the internal buffer back to the pattern. The 'Clear' button clears the patterns for you so you can start all over. The 'Clear Even' button clears every second note from a pattern and the 'Clear Odd' does this as well but starts with the first note. These functions are particularly usefull when you have a pattern with notes but the sounds don't sustain too long and are continually cut-off by the next instrument. By copying the pattern in question to another pattern and then 'Clear 'Even' the first and 'Clear Odd' the other you have split the pattern into 2 patterns. If you now play these patterns simultaneously from the songedit menu, you will hear the same melody but with a richer sound since 2 soundchannels are used. The 'Transpose +1' button will increase all the notes by 1 (transposing) which will result in the melody of the patterns being played 1 note higher. Note that a C-4 note will become a C#4 and not a D-4 note. If you are not sure why this is please, reread the chapter about musical theory. The 'Transpose -1' button decreases all the notes by 1 resulting in the melody being played 1 note lower. Note that these are easy functions to play a musical piece in a different key. The 'Octave up' function transposes the pattern by 12 notes (or 1 octave). This means that the music is still played in the same key but it is one octave higher. The 'Octave Down' is the opposite and lowers the pattern by one octave. The 'Change instr' button changes all the used instruments in the pattern to the currently selected instrument. The notes which use instrument 0 aren't changed.
| Previous page | Next page |
The Song Editor |
The song editor is the place where all the previously created patterns can be arranged into 1 or more songs. The songeditor is the screen which you face first when Jaytrax is started.
Putting it all Together
When you are ready with arranging you can save your masterpiece with the 'Save Song' button. Previously saved songs can be loaded with the 'Load Song' button.

Note that songs which are zipped can be loaded too without prior unzipping it. Also note that there must only be 1 song in the archive, if there are more it is undefined which one will be loaded. The 'Clear All' button clears everything in Jaytrax. All songdata, patterndata and instrument data will be lost, so save everything first!

A song in Jaytrax can consist out of more sub-songs. Every subsong is a song in itself but it shares the patterns and the instruments of the other subsongs. You can select a new subsong by selecting one out of the 'SubSong' droplist. You can rename the current subsong by hitting the 'Rename' button. The 'Delete' button removes the current subsong from memory and the 'New' button adds a new empty subsong to the list. On the bottom of the screen are the playback controls. The 'Play' button plays the currently selected subsong, the 'Pause' button pauses or continues the subsong and the 'Stop' button stops the playback.

In the two 'Startpos' boxes you can select where exactly the subsong will start playing when you click on 'Play'. You can also set this figure by clicking on the ruler just above the graphical grid in the middle of the screen. The two 'Endpos' boxes you can select where the subsong must stop. If the 'Songloop' checkbox is set the song won't end when it reaches the 'Endpos' but it will continue (loop) from the value set in the 'Looppos' boxes. The playback speed of the current subsong is set in the 'Songspd' box and it is defined in BPM (Beats Per Minute). The beats per minute can be easily explained as: 'The number of times you tap your feet to a tune in a minute'. With the 'Groove' dropdown list you can automatically displace every 16'th note a little bit so that the music gets a groovy feel to it. The 'nr of channels' dropdown list let's you select how many audio channels are actually used. It is wise to always set this to the minimum of channels used. The more channels you use the more processor power you will lose due to the costly internal mixing and sound generation process. To monitor how many processing power your song is using at any given moment just watch the 'Processor Overhead' indicator. It tells you how much time percentage wise Jaytrax is using.
![]()
Read the chapter about 'Optimizing Performance' to get some hints and tips about how you can finetune your song so it will be as resource friendly as possible. The large grid in the middle of the screen is a graphical representation of the currently selected subsong. Vertically stacked are 16 available channels and horizontally represents time. On every row you can insert the patterns you have made in the pattern editor. The 16 channels represent the possibility of playing upto 16 patterns simultaneously. See it as a 16 track taperecorder where you have 16 tracks of instruments playing.
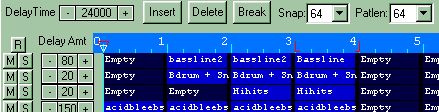
If you play the 16 tracks together, you hear the complete song. Patterns can be used more than 1 time. This doesn't only save time making the song, but it makes the song really compact too which is great if you are going to use your song on a webpage. The row with buttons left of the tracks with the 'M' on it can mute a channel. This is usefull for instance if you want to listen to your music with the solosound temporarily muted. The row with 'S' buttons mutes everything but a channel. This is usefull for instance if you only want to listen to a solo without the accompanying music. The 'R' button above them resets the mute status of all channels. To insert a pattern into the subsong you have to select first which pattern you want to insert by selecting it in the 'Patterns' Selectionbox located on the righthand side of the screen. After you have selected a pattern you can also browse through the patterns by using the cursor-up and cursor-down key. Now that you have selected a pattern to insert you must click on a pattern in the grid where you want to insert it. Note that the new pattern will be inserted before the other. To insert the pattern either click the 'Insert' button or hit the Insert-key. The length of the inserted pattern must be selected beforehand in the 'Patlen' dropdown-list. To delete a pattern you can select one and click on the 'Delete' button or hit the Del-key. To shorten a pattern you have to select the pattern you want to shorten at the point where you want to shorten it. Normally you can't select a pattern elsewhere than on the boundaries of a measure. To be able to select midway you have to set the 'Snap' dropdown list on a value other than 64. The 64 stands for the 64 notes a pattern can contain. If you set the 'Snap' to 16 for instance you can select every 16 notes (a quarter of pattern). The lowest possible selectable resolution is 8. After you have selected a pattern midway you can click on the 'Break' button to break the pattern in half and remove the second bit. The boxes with numbers just before every track specifies exactly how much of this track should be mixed through the echo effect.
![]()
If you specify 0, none of the channel will be echoed, and if you specify 255 the track will be played as if it's recorded in the grand canyon. The echo time can be specified with the 'Delay time' value. This delay time is set in samples/second. Knowing that Jaytrax plays 44100 samples a second you can easily set the time to any exact figure you want. Say that you want an echotime of half a second, set the Delay Time to 44100/2 = 22050. Last but not least you can easily amplify your song by setting the wanted amplification in the 'Song Amplification' field. This value is how much (percentage wise) the song will be amplified.
| Previous page | Next page |
The Sample Editor |
The sample editor is the place where you can edit and load sounds which won't be generated in realtime called samples.
Visualising the sound
The big sample display is probably the most important part of the Sample Editor. The display gives a representation of the audio data of the sample. Just like the waveforms in the previous screens, a sample too is a series of fluctuations around an horizontal axis. The sample is a representation of the movement of the speaker cone in time when it plays that sound.
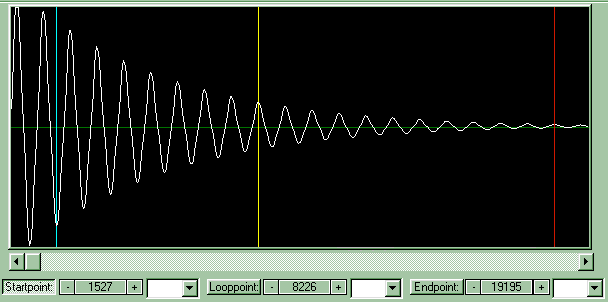
Let's look at the display in detail to carefully explain what you can read of of it. The white line is the actual sample. In our example the sample is a sinewave which rapidly changes amplitude. The vertical blue line in the beginning is the sample starting point. This is the point Jaytrax will start playing when it has to play the sample. The vertical red line is the sample ending point. When the sample reaches this point it either stops or it continues at the sample looppoint which is displayed as the vertical yellow line. To place thesde lines you can either change the 'Startpoint', 'Looppoint' or 'Endpoint' values or you can click one of those buttons and right click anywhere in the display. The corresponding value will then be set. With the 3 dropdown boxes under the display you can easily set the start-, end- or looppoint to a fraction of the total length. This is very easy if you have a long sampled beat which you want to cut up into smaller subbeats. With the slider just under the display you can scroll through the sampledata if you are looking at a magnification. If you drag through the display with your leftmouse button down, you can select a range in the sample. On this selection you can perform operations like cut/paste and zooming.
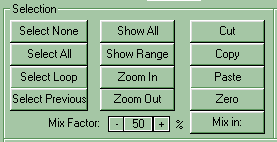
Other ways to change your current selection are the 'Select None' button which disables any selection you might have. The 'Select All' button selects the entire sample. The 'Select Loop' button selects that bit of the sample between the loop- and endpoint. The 'Select Previous' button selects the selection you have used for a previous operation. After selecting a range we can specify what we want to do with it. If you click 'Show Range' the display will zoom in on the sample and show exactly the bit you had selected. Selecting 'Show All' resets the display and shows the entire sample. Clicking the 'Zoom In' and 'Zoom out' buttons let's you gradually zoom in and out on the sampledata. The 'Cut' button removes the selected range out of the sample and stores it in the clipboard. The 'Copy' button only makes a copy of the selection which it will also stop in the clipboard. The 'Paste' button pastes the contents of the clipboard to wherever you had set your selection. If your selection was only one line think, the contents will be inserted.

If you had specified a selection, the selected region will be changed with the contents of the cliboard. Clicking 'Zero' empties the selected range of the wave. Setting a range to zero effectively kills the signal there. The 'Mix in' button does the same as paste but it doesn't rplace the sample with the clipboard sample but it mixes it in. The ratio with which the clipboard sample and the original are mixed can be specified with the 'Mix factor' value. The 'Reverse' button can reverse the selected range. The 'Average' buttons averages out peaks and noises in the selected range. Averaging removes a lot of high frequencys in the process and if you average long enough you will only be left with a low frequency wave. The 'Amplify' button amplifies the selected range with the percentage set in the field next to it. If you amplify a sample too much, clipping will occur and the sample will sound deformed.
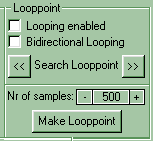
After having manipulated the sample you can specify how Jaytrax should behave when playing the sample. Normally the sample will only be played once. It will start at the Startpoint, and end when it reaches the Endpoint. When you set the 'Looping enabled' toggle, Jaytrax will continue playing the sample from the specified Looppoint after it reaches the Endpoint. It will do so indefinately. When you also specify the 'Bidirectional Looping' Jaytrax will bounce hence and forth between the Loop- and the endpoint. If you try and specify a Looppoint you will quickly learn that this is quite tricky to place one so that you won't hear where the sample loops. Jaytrax has some utility functions to help you with your task. First of all you can Click one of the 'Search Looppoint' buttons to search for the first available probable looppoint to the left or right. A probable looppoint is where the Endpoint and the Looppoint are at an equal point in a wave. If you can't find a proper loooppoint, you can aslo force one by recalcualting a bit of the sample so that it should loop better. This can be done by hitting the 'Make Looppoint' button. This option will recalculate X samples roundabout the endpoint, so that it will loop better. The value for X can be specified in the 'Nr of samples' box.

Finally when you're through manipulating the sampled data you can save the sample with the 'Save Sample' button. The load Sample allows you to load previously saved sample data back into the program. Jaytrax only allows 16 bit mono .WAV files. Some subtypes of WAV are not supported. The 'Delete Sample' removes the sample from memory, this way, Jaytrax will resume using the synthesized sounds instead of sampled data. The 'Samplelength' box gives the amount of bytes used to store your sample in memory. The 'Samplename' is the name of the sample on disk. Last but not least there is a dropdown box called: 'Share sampledata from instrument'. Sample sharing is the ability to use the sampledata of another instrument. This is very usefull if you want to use the same sampledata but with other characteristiques, like the volume setting or different looppoints. Reloading of the sample would not be very efficient, thus you can select with the dropdownbox the instrument whoms sampledata you will use. Please note that if you start editing the shared sampledata, the original sampledata will be edited as well! If you select 'Delete Sample' however you will only disable the samplesharing and you will get your old sample back.
| Previous page | Next page |
The MIDI module |
The MIDI module is the place to turn Jaytrax into a full featured professional synthesizer.
Connecting your gear
Jaytrax supports MIDI in 2 distinct ways:
![]()
You can first of all use any MIDI compatible attached keyboard to enter notes into Jaytrax. If you haven't got a MIDI keyboard, you can also use the keyboard of the computer to act as a MIDI-'keyboard'. Secondly: you can let Jaytrax behave as a stand alone synthesizer that responds to incoming MIDI messages. This second feature can be setup in this screen. In order to let Jaytrax respond to the messages intented for itself some things have to be configured. First of all one has to select the MIDI device to which Jaytrax shopuld respond. Thios can be selected with the dropdown list called 'Select main MIDI input device'. You can have multiple MIDI cards installed on your computer and this selector decides onto which card we are hooked. The 'MIDI activity' led just underneath twinkles when MIDI activity is registered. Even MIDI messqges not meant for Jaytrax is registered.

After selecting the MIDI device we now need to configure the MIDI channels Jaytrax should respond to. There are 16 available MIDI channels and since there can be more than one MIDI device hooked up we have to select to which MIDI channel Jaytrax must respond. On the screen are the 16 channels displayed in rows. Everyone of the channels can be actived with the 'Acitve' checkbox. When activated, Jaytrax will try and interpret incoming MIDI messages for that channel. The 'Instrument' dropdown list selects which instrument should be heared when Jaytrax receives 'Note-on' MIDI messages on that channel. If the 'Pgm Chng' checkbox is selected, Jaytrax will interpret the incoming 'Program change' MIDI messages and change the currently selected instrument on that channel if possible. If the 'Ctrl-Chng' checkbox is selected, Jaytrax will process the incoming 'Control Change' MIDI messages. More hereover later. The 'Nr of Channels' box selects the number of allocated Jaytrax sound reproduction channels for the MIDI channel. Jaytrax has a maximum of 16 sound channels playing simultaneously so choose them wisely. Last but not least, the 'Delay Amount' selects how much Echo the sounds on that MIDI channel should have.
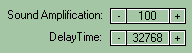
With the 'Delay Time' box you can specify at how big an interval the echo effect should occur. The amount is given in samnples per second. This means that if you set it to 44100, the echo time will be exactly 1 second. The 'Sound Amplification' is the amount (percentagewise) the sound will be amplified before it is send to the speakers.
Just like in the pattern editor, Jaytrax supports the manipulation of instrument parameters through MIDI messages. This is done through 'Control Change' MIDI messages. Control changes are used to send data other than note data through MIDI. The Control Change messages Jaytrax responds to are the following: Message 123 - 127 All Notes Off. When Jaytrax receives this, all sound is stopped. Control Change 16 is used in the same manner as the Script number in the pattern editor. Just like you could select a script in the pattern editor, you can select one with Control Change 16. After selecting the script you can execute the script with a value by sending a Control Change nr 17 or 18 with the corresponding value. The difference between using Control Change message 17 or 18 is it's scope. Since MIDI messages are limited to 7 bits (is 0-128) data and Jaytrax needs 8 bits (0-256) you have to select the mapping method used. If you use Control change nr 17 the value is not converted and just used. When using Control Change 18 however the value is doubled before it is used. This way the 0-128 value is converted to the 0-256 value.
An example might by enlightening. Say we want to change the main volume to 200 of the currently playing instrument. We now from the pattern editor that the 'CHNG MASTER VOL' controller script is nr 4. So first of all we send a Control Change MIDI message nr 16 (from the MIDI sequencer you are using) with parameter 4. Then we send a Control Change MIDI message nr 18 with parameter 100. The value 100 is doubled by Jaytrax before it is used and so in effect the volume is changed to 200. To know how you can send Control Change messages from your MIDI sequencer please refer to the Help guide from your program.
| Previous page | Next page |
Optimizing Performance |
Since the resources of a computer are limited it is wise to use them well. The two main resources we are concerned with are the memory usage and the amount of processortime consumed. You could aim for a low-memory kind of song if you want your music to be able to be downloaded from the web. If you use loads of big 'samples' of all kinds of exotic instruments you'll soon notice that your songs inflate to epic proportions. If you want people to be able to download them with a 14K4 modem to would have to wait forever. On the other hand, if you use only fancy synthetic sounds you can make your songs really small. Especially if you archive your song with a Zip-utility the endresult can be extemely small, where sizes of 5kb are no exception. This is ideal for Web based applications. The downside of using the synthetic sounds is that it consumes more processortime since the instruments are calculated realtime. Therefore if you are planning to use the music in a game for instance you could decide to only use samples (since memory doesn't matter here) and here and there some synthetic sounds and this way have a lot of processortime left to do something else as well. If you use Jaytrax just as a medium to make music and you don't have a special purpose for the endresult other than listening to it you can do any combination as you please. Keep in mind that with the synthetic sounds the rule of thumb is that: The more special effects you use on the more channels, the more processor time it will eat. So If you start composing, don't start immediatly with 16 channels open and play those fancy heavy special effects sounds, because chances are that the computer won't be able to handle it all… A preferred method is to start off with say 4 channels and then start designing the instruments you will use. With the nr of channels set to 4 you can't overload the computer with more than rendering your sound more than 4 times. Don't forget that everytime you hit the keyboard and produce a sound the computer has to internally render the same sound again. With 16 channels this can obviously be too much. Then again, if you have a Dual-Pentium II 400Mhz forget what I have just said… Typically the processor usage is less when you play your finished song then when you are still edting and creating it. This is because the more time-consuming synthetic sounds will usually be played in 1 or 2 channels in your finished song, but they will be played on every available channel when you are playing them 'live' on the keyboard.
| Previous page | Next page |
|
|
Registration
|
ghkghkgh.jkg.kgghk
ghk
gkh
gkh
ghkg'hljkglkghlkg;hlk';glk;lghkj;lghk;klkhl;khkhkgklgl
| Previous page |
|
Next page |
Controller-Scripts
000 NONE
001 PITCHBEND
002 CHNG WAVEFORM
003 CHNG WAVELENGTH
004 CHNG MASTER VOL
005 CHNG AMWAVE
006 CHNG AMSPD
007 CHNG AMLPPOINT
008 CHNG FINETUNE
009 CHNG FMWAVE
010 CHNG FMSPD
011 CHNG FMLPPOINT
012 CHNG FMDELAY
013 CHNG ARPEGGIO
O14 CHNG EFF#1 DESTWAVE
015 CHNG EFF#1 SRCWAVE1
016 CHNG EFF#1 SRCWAVE2
017 CHNG EFF#1 OSCWAVE
018 CHNG EFF#1 VARIABLE1
019 CHNG EFF#1 VARIABLE2
020 CHNG EFF#1 FXSPEED
021 CHNG EFF#1 OSCSPEED
022 CHNG EFF#1 OSCSELECT
023 CHNG EFF#1 TYPE
024 CHNG EFF#2 RESETEFFECT
O25 CHNG EFF#2 DESTWAVE
026 CHNG EFF#2 SRCWAVE1
027 CHNG EFF#2 SRCWAVE2
028 CHNG EFF#2 OSCWAVE
029 CHNG EFF#2 VARIABLE1
030 CHNG EFF#2 VARIABLE2
031 CHNG EFF#2 FXSPEED
032 CHNG EFF#2 OSCSPEED
033 CHNG EFF#2 OSCSELECT
034 CHNG EFF#2 TYPE
035 CHNG EFF#2 RESETEFFECT
O36 CHNG EFF#3 DESTWAVE
037 CHNG EFF#3 SRCWAVE1
038 CHNG EFF#3 SRCWAVE2
039 CHNG EFF#3 OSCWAVE
040 CHNG EFF#3 VARIABLE1
041 CHNG EFF#3 VARIABLE2
042 CHNG EFF#3 FXSPEED
043 CHNG EFF#3 OSCSPEED
044 CHNG EFF#3 OSCSELECT
045 CHNG EFF#3 TYPE
046 CHNG EFF#3 RESETEFFECT
O47 CHNG EFF#4 DESTWAVE
048 CHNG EFF#4 SRCWAVE1
049 CHNG EFF#4 SRCWAVE2
050 CHNG EFF#4 OSCWAVE
051 CHNG EFF#4 VARIABLE1
052 CHNG EFF#4 VARIABLE2
053 CHNG EFF#4 FXSPEED
054 CHNG EFF#4 OSCSPEED
055 CHNG EFF#4 OSCSELECT
056 CHNG EFF#4 TYPE
057 CHNG EFF#4 RESETEFFECT
058 CHNG RESET WAVE #1
059 CHNG RESET WAVE #2
060 CHNG RESET WAVE #3
061 CHNG RESET WAVE #4
062 CHNG RESET WAVE #5
063 CHNG RESET WAVE #6
064 CHNG RESET WAVE #7
065 CHNG RESET WAVE #8
066 CHNG RESET WAVE #9
067 CHNG RESET WAVE #10
068 CHNG RESET WAVE #11
069 CHNG RESET WAVE #12
070 CHNG RESET WAVE #13
071 CHNG RESET WAVE #14
072 CHNG RESET WAVE #15
073 CHNG RESET WAVE #16
074 CHNG BPM
075 CHNG GROOVE
076 FIRE EXTERNAL EVENT